
How To: Convertible top replacement (Long!)


Thread Starter
|
1st Gear Member
Joined: Nov 2008
Posts: 214
From: Western NY
Don't think I posted this on here - hopefully this helps someone.
This is a follow-up to this post: My winter resurrection project (long post)
Replacing a Camaro/Firebird convertible top
Items needed:
Phillips screwdriver
4mm hex wrench/Allen key
10mm socket (6-point preferable)
T50 Torx socket/bit
Large flat screwdriver or straightedge
Large staple gun, with 3/8� and 1/4� staples (I used Arrow T50 #506 and #508)
Sharpie pen, crayon/chalk
It�s also best to keep track of where the screws go � they are different throughout the top
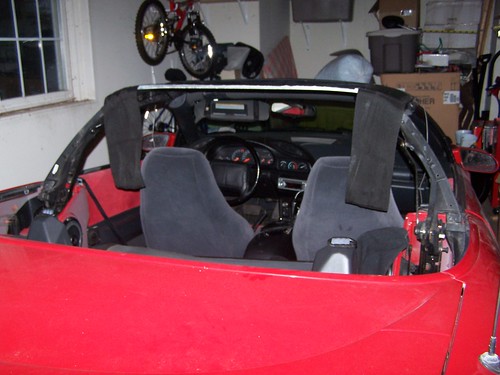
Removal:
1) Disconnect battery.
2) In trunk on driver�s side, turn the top pump valve fully clockwise (should be about � turn).
3) Unlatch top, push back about halfway. Top mechanism will be stiff, but moveable.
4) Fold the rear seat flat.
5) Remove the inner rear quarter panels � you will need the T50 Torx for the seat latch bolts. There is also a screw outboard of the front seat belts, only easily accessible with the top folded back. Once those two are out, the panel can be rotated upward and forward � just be careful of the quarter-panel light connector inside.
6) Lower the top again � but you don�t have to latch it. It will be easier to get to the rear bolts, etc.
7) At rear of car by each side of the window, remove the two short Phillips screws holding the back of the headliner in place. If you have a defogger grid, also disconnect the wires and pull them out of the top.
8) There will be a set of 10mm nuts holding the back of the top to the rear of the car. This strip runs to just behind the door on each side. Some of the bolts are hidden by trim pieces. You can remove them � I just bent them out of the way.
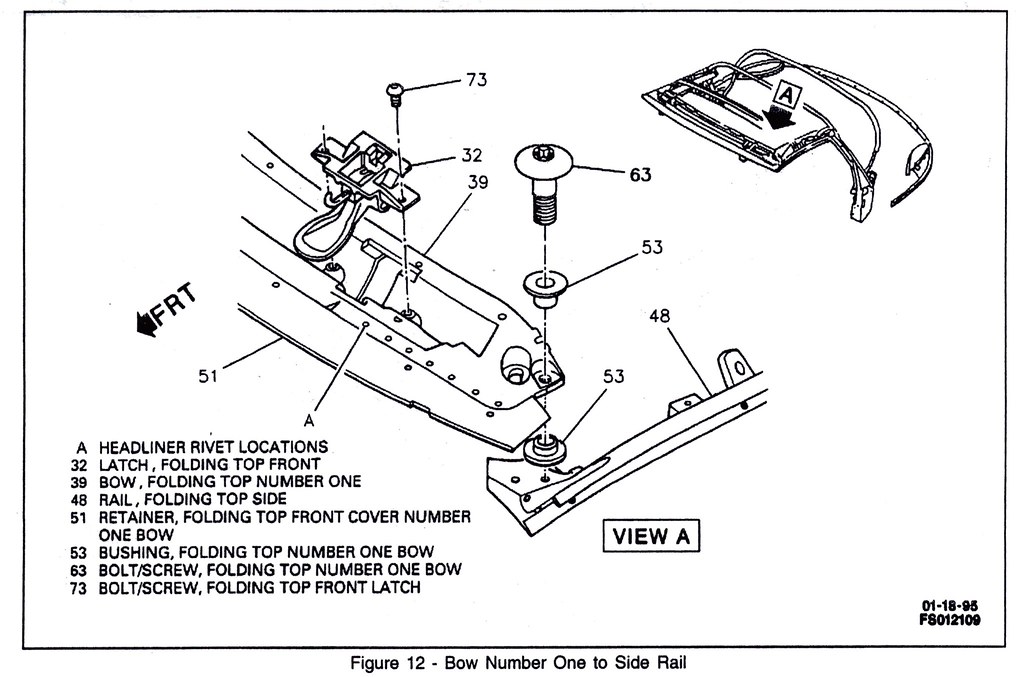
9) Dislodge the rear strip (known as bow #5 in the parts diagrams) This will pop free � but may be a bit tight to get out. It�s easier to do the center from inside, while the sides are easier from outside.
10) Push up the top halfway. Remove the weatherstripping from both sides � the top piece pulls right out (it�s just glued), while the rear piece has a screw at the bottom, underneath the black triangle trim.
11) There is an additional screw holding the top fabric next to that one, under the black triangle trim. You can remove that one now, too.
12) The weatherstrip holders are held on with long screws too � three for each piece above the window, four along the back.
13) The headliner door trim is held on with three smaller screws � remove those.
14) The inner headliner to header bow trim is held on by screws as well. Once that is loose, the headliner will come down. It�s also clamped/clipped on to the next two bows � they just pop off. The rear edge of the headliner is held on in a channel, and can�t be removed as easily. I left it to the end.
15) The sides of the headliner (next to the door glass) are held on by Velcro/snaps. That can be undone, as well as the pair of short screws up by bow #3/#4 at the top.
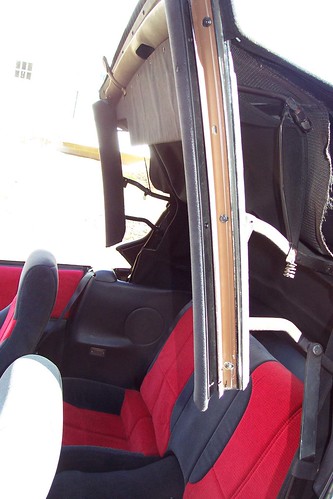
16) The black triangle trim can be removed by reaching behind the piece, and undoing the two 4mm Allen screws that hold it on.
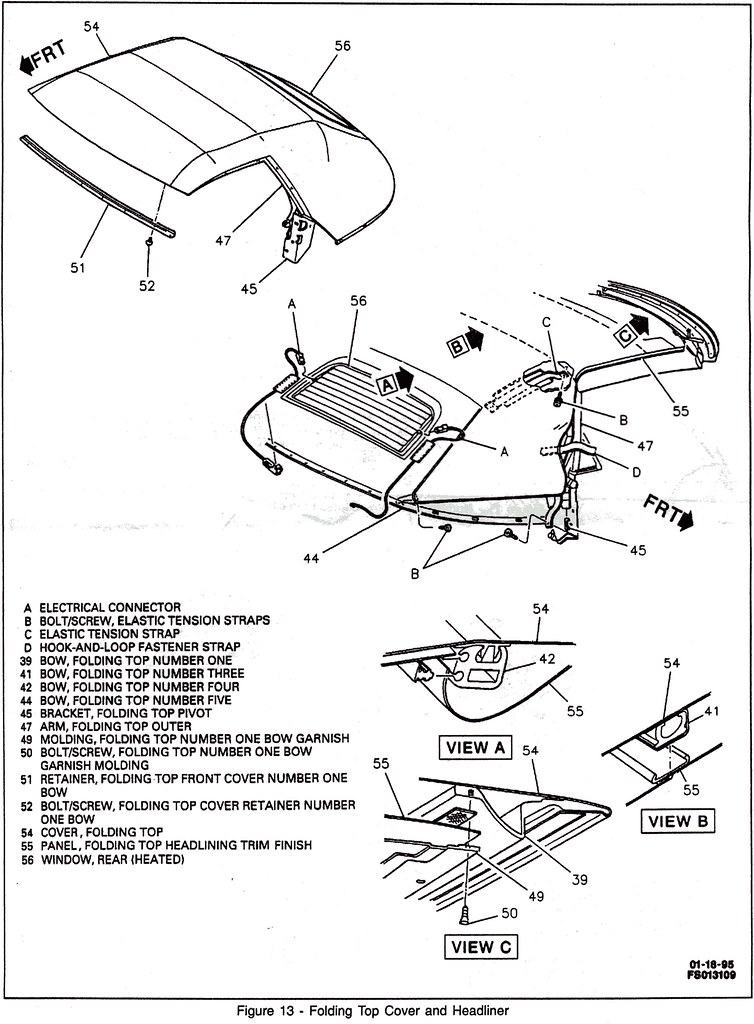
17) The top itself can be removed from the back, going forward. I left #5 bow attached to see where the rest of the parts fit. #4 bow can also be detached with a pair of short 4mm Allen screws on each side. Note, the rear window and the back of the headliner are attached to #4 bow via tongue and channel. I popped one side of the headliner free (the last attachment is down by the mechanism hinge deep in the quarter panel � kept in by a pushpin) and pulled it out sideways from the channel. There is also another reinforcement (looks like a wide nylon strap). Pull this one free of its staples in bow #4.
Note: if you can do this without pulling that headliner pushpin out, do so. It�s a pain to put it back into place.
18) There is a reinforcement (looks like nylon belt webbing) stapled to bow #4 and running forward. Mark this location and remove the staples to it to free the bow.
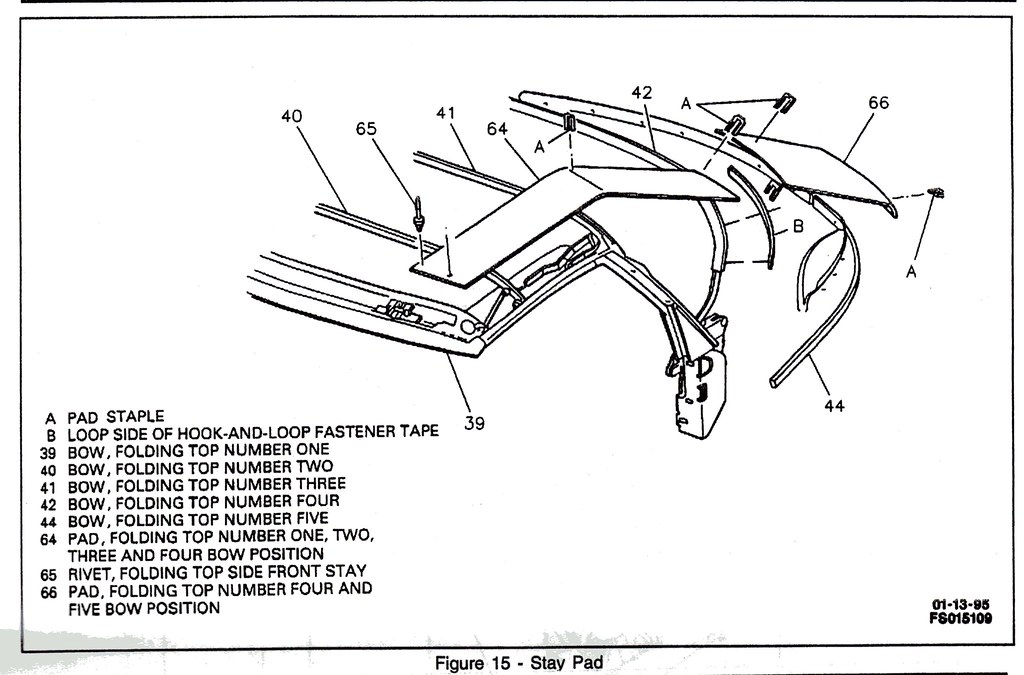
19) Once the top is past #3 bow, you should see the top cables in place on each side, above the windows. Undo those (sometimes one, sometimes two) screws holding it in place. The top also has tongues of fabric glued to #3 and #2 bows. This can be peeled off.
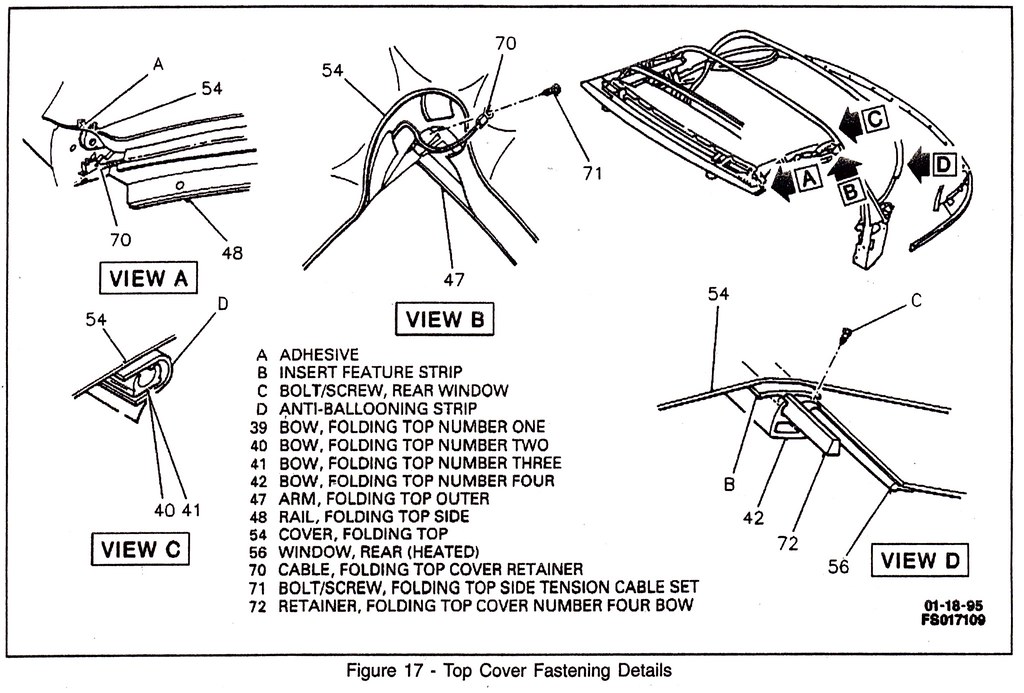
20) At the front edge of the header bow, undo the screws holding the front plate in place. At this point, the front is glued on � peel that off, and the top should be free. I left the top cables attached to the header bow.
Replacement:
I marked all of the locations of the fabric under-pieces, reinforcements, etc using a sharpie on bows #5 and #4 before removing the top from them. It makes it easier to re-staple them in place later. The new top should have extra fabric sewn to it which will attach to the bows in some way.
1) Remove/replace rear window in channel on bow #4.
2) Staple the tongue of fabric at the back of the top cover to the top of bow #4 using the short staples. Be sure to center the top to the bow. Also, there�s a reinforcing side piece that also has to be stapled to bow #4 on each side of the top. This side piece has some elastic attached to them to keep the top down over the window.
3) Measure the length of the old rear window to gauge the length on the new one. Staple the new rear window to bow #5. Be sure to keep this centered as well. Also, trim the rear window fabric some to clear the slots.
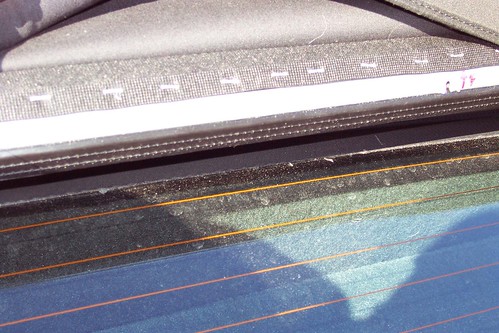
4) Staple the rear sides of the top to bow #5 � it�s best to start from the front and work backwards, keeping the fabric tight. Also, be sure to staple the bottom part of the reinforcing side pieces along with the rear window. Expect parts of the top to be thicker � by the front corners as well as where the layers overlap. Here you will need the longer staples.
Note: I started the fabric about �� back from the bow end to keep it from wrinkling on mine. Fabric patterns might differ slightly. Also, trim where the slots are here as well.
5) Once that�s in place, the assembly goes back to the car. Reattach bow #4 using the pair of 4mm Allen screws. I put the rear headliner channel back into place here too.
6) Working from back to front, reattach bow #5. It may take a bit of work to get the bow back on the studs.
7) Re-staple that heavy nylon strap reinforcement to bow #4. Lower the top, but don�t latch it. Make sure everything is snug, not tight.
8) Slide the top cables along the sleeves in the part of the top above the windows, and secure the cables in place w/ its screws.
9) Lay the top out over the rest of the frame. Pull the sides down behind the windows and you can pop one screw in to hold the fabric down. (This is the one under the black triangle trim.)
10) With the top down, fold over and mark the front edge of the top on the fabric.
11) Raise the top again. You can reglue the top into position at this point (I just used the screws and plate to hold it in place. Be sure to pull the top an additional 1/4 to 1/2� or so past the mark you made, to get the top tight. Once all the screws are in place, you can lower the top again. Check to see if the top is tight.
12) The tongues on the top fabric then can be re-glued to bows #3 and #2 � I just held them in place with the headliner clips.
13) Replace the headliner, first with the screws between the sides of bows #3 and #4, then the rear screws, then the clips going forward. Replace the headliner/header/door trim pieces (all three) to finish that off.
14) Raise the top halfway again. Be sure the top material is tight enough in place along the vertical part of the top. Trim holes for the screws along the back of the window. Replace the black triangle trim with the 4mm Allen screws. Replace the weatherstripping channels as well. The rear weatherstrip channels will also help to hold the top in place.
Note: if you�ve been having problems with window sealing, you can shift the weatherstripping channels a little outward � the screw holes are slotted.
15) Once the weatherstrip channels are in place, replace the weatherstrip. I used a large flat-bladed screwdriver to push the weatherstrip into the notches holding it in place � just be careful not to rip it.
16) Snap/Velcro the last bit of headliner into place along the sides.
17) Replace the inner quarter panel pieces (don�t forget the light connectors).
18) Lower the top and latch it into place. It should be VERY tight. At this point, expect not to undo it for a couple weeks to let it �set�.
19) Turn top pump back on (counterclockwise), and reconnect battery. Also reconnect the defogger wires if you have them.
That�s it. Took me a week (about 8 or so hours alone) to do this.
This is a follow-up to this post: My winter resurrection project (long post)
Replacing a Camaro/Firebird convertible top
Items needed:
Phillips screwdriver
4mm hex wrench/Allen key
10mm socket (6-point preferable)
T50 Torx socket/bit
Large flat screwdriver or straightedge
Large staple gun, with 3/8� and 1/4� staples (I used Arrow T50 #506 and #508)
Sharpie pen, crayon/chalk
It�s also best to keep track of where the screws go � they are different throughout the top
Removal:
1) Disconnect battery.
2) In trunk on driver�s side, turn the top pump valve fully clockwise (should be about � turn).
3) Unlatch top, push back about halfway. Top mechanism will be stiff, but moveable.
4) Fold the rear seat flat.
5) Remove the inner rear quarter panels � you will need the T50 Torx for the seat latch bolts. There is also a screw outboard of the front seat belts, only easily accessible with the top folded back. Once those two are out, the panel can be rotated upward and forward � just be careful of the quarter-panel light connector inside.
6) Lower the top again � but you don�t have to latch it. It will be easier to get to the rear bolts, etc.
7) At rear of car by each side of the window, remove the two short Phillips screws holding the back of the headliner in place. If you have a defogger grid, also disconnect the wires and pull them out of the top.
8) There will be a set of 10mm nuts holding the back of the top to the rear of the car. This strip runs to just behind the door on each side. Some of the bolts are hidden by trim pieces. You can remove them � I just bent them out of the way.
9) Dislodge the rear strip (known as bow #5 in the parts diagrams) This will pop free � but may be a bit tight to get out. It�s easier to do the center from inside, while the sides are easier from outside.
10) Push up the top halfway. Remove the weatherstripping from both sides � the top piece pulls right out (it�s just glued), while the rear piece has a screw at the bottom, underneath the black triangle trim.
11) There is an additional screw holding the top fabric next to that one, under the black triangle trim. You can remove that one now, too.
12) The weatherstrip holders are held on with long screws too � three for each piece above the window, four along the back.
13) The headliner door trim is held on with three smaller screws � remove those.
14) The inner headliner to header bow trim is held on by screws as well. Once that is loose, the headliner will come down. It�s also clamped/clipped on to the next two bows � they just pop off. The rear edge of the headliner is held on in a channel, and can�t be removed as easily. I left it to the end.
15) The sides of the headliner (next to the door glass) are held on by Velcro/snaps. That can be undone, as well as the pair of short screws up by bow #3/#4 at the top.
16) The black triangle trim can be removed by reaching behind the piece, and undoing the two 4mm Allen screws that hold it on.
17) The top itself can be removed from the back, going forward. I left #5 bow attached to see where the rest of the parts fit. #4 bow can also be detached with a pair of short 4mm Allen screws on each side. Note, the rear window and the back of the headliner are attached to #4 bow via tongue and channel. I popped one side of the headliner free (the last attachment is down by the mechanism hinge deep in the quarter panel � kept in by a pushpin) and pulled it out sideways from the channel. There is also another reinforcement (looks like a wide nylon strap). Pull this one free of its staples in bow #4.
Note: if you can do this without pulling that headliner pushpin out, do so. It�s a pain to put it back into place.
18) There is a reinforcement (looks like nylon belt webbing) stapled to bow #4 and running forward. Mark this location and remove the staples to it to free the bow.
19) Once the top is past #3 bow, you should see the top cables in place on each side, above the windows. Undo those (sometimes one, sometimes two) screws holding it in place. The top also has tongues of fabric glued to #3 and #2 bows. This can be peeled off.
20) At the front edge of the header bow, undo the screws holding the front plate in place. At this point, the front is glued on � peel that off, and the top should be free. I left the top cables attached to the header bow.
Replacement:
I marked all of the locations of the fabric under-pieces, reinforcements, etc using a sharpie on bows #5 and #4 before removing the top from them. It makes it easier to re-staple them in place later. The new top should have extra fabric sewn to it which will attach to the bows in some way.
1) Remove/replace rear window in channel on bow #4.
2) Staple the tongue of fabric at the back of the top cover to the top of bow #4 using the short staples. Be sure to center the top to the bow. Also, there�s a reinforcing side piece that also has to be stapled to bow #4 on each side of the top. This side piece has some elastic attached to them to keep the top down over the window.
3) Measure the length of the old rear window to gauge the length on the new one. Staple the new rear window to bow #5. Be sure to keep this centered as well. Also, trim the rear window fabric some to clear the slots.
4) Staple the rear sides of the top to bow #5 � it�s best to start from the front and work backwards, keeping the fabric tight. Also, be sure to staple the bottom part of the reinforcing side pieces along with the rear window. Expect parts of the top to be thicker � by the front corners as well as where the layers overlap. Here you will need the longer staples.
Note: I started the fabric about �� back from the bow end to keep it from wrinkling on mine. Fabric patterns might differ slightly. Also, trim where the slots are here as well.
5) Once that�s in place, the assembly goes back to the car. Reattach bow #4 using the pair of 4mm Allen screws. I put the rear headliner channel back into place here too.
6) Working from back to front, reattach bow #5. It may take a bit of work to get the bow back on the studs.
7) Re-staple that heavy nylon strap reinforcement to bow #4. Lower the top, but don�t latch it. Make sure everything is snug, not tight.
8) Slide the top cables along the sleeves in the part of the top above the windows, and secure the cables in place w/ its screws.
9) Lay the top out over the rest of the frame. Pull the sides down behind the windows and you can pop one screw in to hold the fabric down. (This is the one under the black triangle trim.)
10) With the top down, fold over and mark the front edge of the top on the fabric.
11) Raise the top again. You can reglue the top into position at this point (I just used the screws and plate to hold it in place. Be sure to pull the top an additional 1/4 to 1/2� or so past the mark you made, to get the top tight. Once all the screws are in place, you can lower the top again. Check to see if the top is tight.
12) The tongues on the top fabric then can be re-glued to bows #3 and #2 � I just held them in place with the headliner clips.
13) Replace the headliner, first with the screws between the sides of bows #3 and #4, then the rear screws, then the clips going forward. Replace the headliner/header/door trim pieces (all three) to finish that off.
14) Raise the top halfway again. Be sure the top material is tight enough in place along the vertical part of the top. Trim holes for the screws along the back of the window. Replace the black triangle trim with the 4mm Allen screws. Replace the weatherstripping channels as well. The rear weatherstrip channels will also help to hold the top in place.
Note: if you�ve been having problems with window sealing, you can shift the weatherstripping channels a little outward � the screw holes are slotted.
15) Once the weatherstrip channels are in place, replace the weatherstrip. I used a large flat-bladed screwdriver to push the weatherstrip into the notches holding it in place � just be careful not to rip it.
16) Snap/Velcro the last bit of headliner into place along the sides.
17) Replace the inner quarter panel pieces (don�t forget the light connectors).
18) Lower the top and latch it into place. It should be VERY tight. At this point, expect not to undo it for a couple weeks to let it �set�.
19) Turn top pump back on (counterclockwise), and reconnect battery. Also reconnect the defogger wires if you have them.
That�s it. Took me a week (about 8 or so hours alone) to do this.
Thread Starter
|
1st Gear Member
Joined: Nov 2008
Posts: 214
From: Western NY
I still have to sort through a few pics, but here's some of the illustrations
1) shot of the corner (this one's driver's side) - you can see the screw that holds the back of the headliner to bow #5
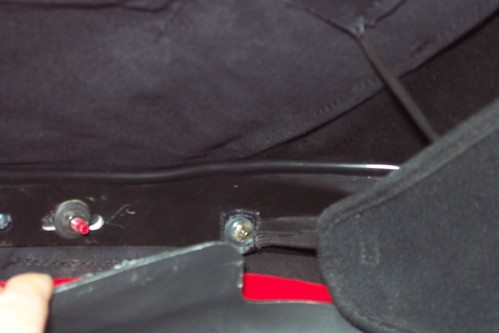
2) shot of the other nuts holding in bow #5 - this is the driver's side
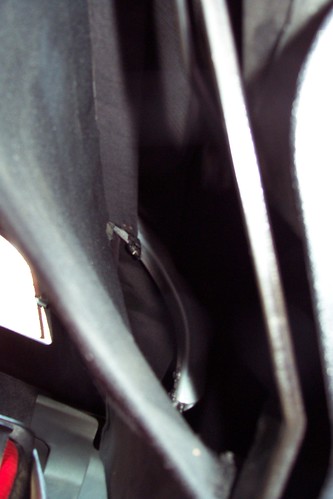
3) pic of the upper screws holding in the headliner at bow #4 (looking back from the front edge of the sail panel)
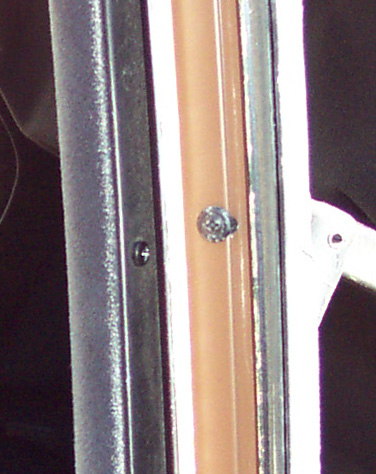
4) screws for the weatherstrip underneath the triangle trim. Note there's another spot under the front edge - but I didn't have screws there.
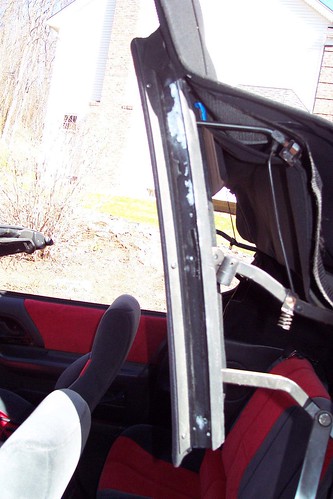
5) with the top off - you can see the nylon webbing reinforcements on each side. Note, bow #4 is already off here.
6) staples along bow #4 (rear of top to top side #4) as well as the top of the rear window. I need to find a better pic of this.
Hopefully I'll have other pics shortly.
1) shot of the corner (this one's driver's side) - you can see the screw that holds the back of the headliner to bow #5
2) shot of the other nuts holding in bow #5 - this is the driver's side
3) pic of the upper screws holding in the headliner at bow #4 (looking back from the front edge of the sail panel)
4) screws for the weatherstrip underneath the triangle trim. Note there's another spot under the front edge - but I didn't have screws there.
5) with the top off - you can see the nylon webbing reinforcements on each side. Note, bow #4 is already off here.
6) staples along bow #4 (rear of top to top side #4) as well as the top of the rear window. I need to find a better pic of this.
Hopefully I'll have other pics shortly.
Thread Starter
|
1st Gear Member
Joined: Nov 2008
Posts: 214
From: Western NY
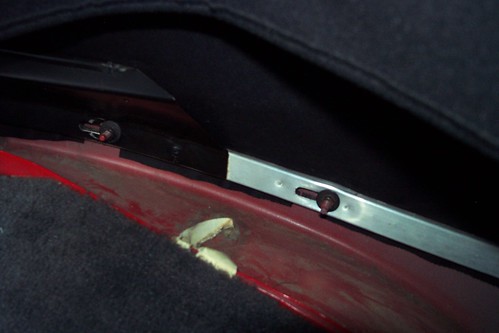
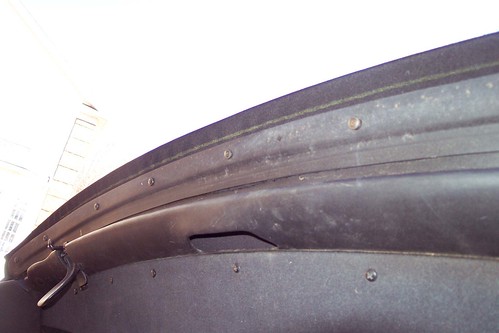
Here's a better pic of #6. Also note in the upper-right-hand corner of the pic (by the red sharpie marks) - I had to drill out a rivet that held the old window in place.
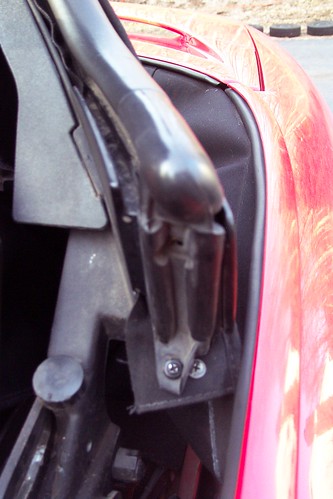
7) Here's a shot of the over-the-door part weatherstrip holder
8) This is a close-up of one of the screws - you can see the hole it's in is slotted. I pushed the holder out as far as it would go to help with window sealing.
9) Here's a shot of the door trim screws - you can only get at these when the weatherstrip holder's off.
10) Here's a shot of the header bow - the yellow crayon marked the original edge where the fabric was pulled when first laid out - pulling it down and forward keeps the top tight. You can see how much the top material stretches by how much I pulled this forward.
Hope this helps. If there are any questions, feel free to pm me.
Last edited by traumadog; Apr 12, 2009 at 04:10 PM.


Newbie
Joined: Nov 2009
Posts: 1
Traumadog: Thanks for the informative article, especially the pictures. I am stuck trying to get the section of the old top out directly behind the door window at the triangle. Dont want to tear out the rubber weather stripping that seals the window to the top or do I have to. Cant seem to find the screws that release this section of top described by the #47 on the diagrams. Any thoughts?
Thread Starter
|
1st Gear Member
Joined: Nov 2008
Posts: 214
From: Western NY
Traumadog: Thanks for the informative article, especially the pictures. I am stuck trying to get the section of the old top out directly behind the door window at the triangle. Dont want to tear out the rubber weather stripping that seals the window to the top or do I have to. Cant seem to find the screws that release this section of top described by the #47 on the diagrams. Any thoughts?
But yes, you have to remove the weatherstripping, holder (#47) and the triangle (#46) to get the fabric out. #47 is held to #46 by a bunch of screws, under the weatherstripping.
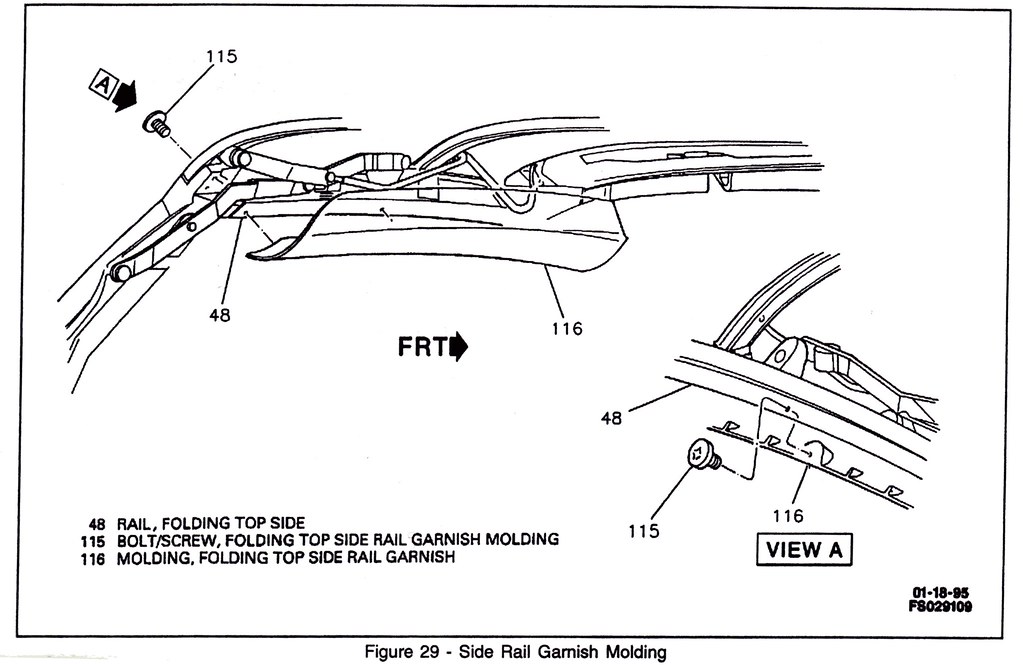
The triangle's removed in step #16 - removing the 4mm Allen-head screws (you reach them from the back side). Once the triangle is off, the whole sail panel is detached from the top. You should be able to pop Bow #5 up and out of the car & lift the top free.

Newbie
Joined: Jun 2011
Posts: 2
From: Utah
I am in the position of having to do this very thing as well in the near future as my rear window is coming apart from the fabric. What brand is the best recommendation for a replacement? I was told the original cannot be found new. I checked with a shop that specializes in replacing convertible tops and they gave me a price of $1,000 total to order the parts and installation, does this sound reasonable?

1st Gear Member
Joined: Jun 2005
Posts: 104
From: Dirty South Jersey
I am in the position of having to do this very thing as well in the near future as my rear window is coming apart from the fabric. What brand is the best recommendation for a replacement? I was told the original cannot be found new. I checked with a shop that specializes in replacing convertible tops and they gave me a price of $1,000 total to order the parts and installation, does this sound reasonable?

Thread
Thread Starter
Forum
Replies
Last Post
panzercannon01
93-02 V6 Tech
0
Sep 28, 2009 09:10 AM